Notator SL and Creator SL are exactly alike, except for the fact
that Notator (as its name implies) handles notation in addition to MIDI
sequencing.
That is, display notes on the screen (which can be edited, affecting
not only the display but also the actual music) and finally getting the
musical piece printed on paper.
There is also a third program which is not very well known called
"Notator Alpha".
Alpha is a very basic and cut down version of Notator SL, mainly aimed
at the educational market teaching the basics of music and notation.
(To keep things simple "Notator SL" and "Creator SL" are often just referred to as "Notator", so from here on "Notator" will refer to both programs unless specifically noted.)
Here are some screenshots from Notator:
| |
Notator main screen (will open new window) | |
Notator edit (1) (will open new window) |
| |
Notator score (notation) 1 (will open new window) | |
Notator edit (2) (will open new window) |
| |
Notator score (notation) 2 (will open new window) | |
Notator edit (3) (will open new window) |
| |
Notator score (notation) 3 (will open new window) | |
Notator "Fittime calculator" (will open new window) |
| |
Notator synchronization (will open new window) | |
Notator Sysex dump (will open new window) |
"SL" stands for "SoftLink"; a very basic multitasking system allowing you to run several programs side by side.
This could mean running Notator, a word processor and a
synthesizer editor/librarian
all at the same time (providing you have the memory available of
course), saving you a lot of time when one would normally have to quit
one program to start the next one.
SoftLink is not a complete multitasking operating system such as MagiC
or Geneva, but rather a basic "program-switcher".
Remember, this was years before multitasking was generally available
for the Atari ST and quite an achievement in itself!
Several users have reported it to work pretty well, but you really need
at lest 2 Mbytes of memory (4 Mbytes recommended for serious use).
Using SoftLink
SoftLink works like this:
Say you want to run Notator SL, a synthesizer editor (for editing
sounds) and a text-editor (for taking notes). Provided you have enough
memory you will do as follows:
- Run "LINKEDIT.PRG" to configure your setup (how many
partitions, how much memory each partition should use etc.).
In this example we will be setting up 3 partitions
Notator always uses the first partition. - Start SoftLink by clicking on "Start SoftLink".
This starts SoftLink and immediately loads Notator into SoftLink memory partition 1. - Press (and hold) <right-shift> while pressing <2> on the numeric keypad. This switches over to partition 2 (you will see a small "2" in the upper left-hand corner of the screen.
- Start the program you want to load into SoftLink memory-partition 2 (i.e. the synthesizer editor).
- Press (and hold) <right-shift> while pressing <3> on the numeric keypad to change over to SoftLink memory-partition 3.
- Load whichever program you want to reside in partition 3 (a text-editor in this example).
You are now finished setting things up and can change between
the three
partitions by pressing (and holding) <right-shift> and the number
of the partition you want, using the numeric keypad of the Atari ST.
The next time you want to use SoftLink (with the same setup), you don't
need to run the setup program as used in the above example, but
double-click "SOFTLINK.PRG" instead.
Then you can load the various programs into each partition as
explained.
Running SoftLink with/without
Notator
A simple, but useful tip:
When SoftLink is started, Notator is always started, and placed in
memory partition 1 by default.
How about using that memory partition for something else in case you
want to run several programs under SoftLink, but Notator isn't one of
them?
A simple trick will show you how...
- Locate the SoftLink files (3 files).
(It should be in the same folder as everything else belonging to Notator) - Create a new folder (anywhere you like) and copy the
following files to this folder:
LINKEDIT.PRG
LINKEDIT.RSC
SOFTLINK.PRG
Now you have two independant sets of SoftLink which in turn gives you two options:
Running SoftLink with Notator:
If you want to run SoftLink as before, where Notator is also loaded
(into memory partition 1), just double-click "SOFTLINK.PRG" which
you'll find in the same folder alongside the Notator program and
associated files (or run "LINKEDIT.PRG" if you need to change memory
partitions etc., also from the same location).
Running SoftLink without Notator:
If you don't want Notator to be loaded automatically into memory as
soon as SoftLink is started (i.e. you want to use SoftLink for other
programs and could need that extra memory) you simply go to that newly
created folder and start "SOFTLINK.PRG" (or "LINKEDIT.PRG") from there.
This will start SoftLink and return you to the desktop. From then on
you are free to fill your assigned memory partitions with whatever
programs you want (provided they work with SoftLink of course).
Notator Logic is an entirely different program from Notator even
though a few features are similar.
"Logic" (as it's often referred to) is available for the Atari
ST/Falcon, PCs running Windows and Apple Macintosh. Song files are
interchangeable
between platforms.
(It has also been reported that .SON (song) files from Notator can be
imported into Logic, and of course MIDI files which any decent MIDI
sequencer can handle.)
Logic is still being developed and supported by Emagic though the Atari
version seems to have reached its final release at version 2.5 and will
probably not be developed any further for this platform.
Those who buy (or upgrade to) Notator Logic for the Atari ST (it
also works with the Falcon and TT) receive a "Log 3" -a hardware
device, (a "Black box" if you will) which plugs into the cartridge
port.
This unit is in fact the dongle itself and handles both Notator Logic
and Notator SL 3.21 (which also comes with the package "for free", but
unfortunately there's no manual as it's obviously geared towards
ex-Notator users upgrading to Logic who might still need to run Notator
SL every once in a while).
In addition it also provides 3 extra MIDI OUT connectors (equivalent to
the "Export" unit's "B", "C" and "D" outputs when used with Notator SL.
Songs created in Notator with Export will automatically be routed to
the correct outputs of the Log-3.
You should NOT insert a
Notator SL (or Creator SL) dongle into the Log-3!
If you do you might end up with a damaged dongle and/or computer!!!
The cartridge "through" connector on the
Log-3 is made for other dongle
based programs or devices such as C-Lab's "Unitor-2" and/or "Combiner".
All of this only applies to those who have bought both stand-alone
packages separately as one would normally trade in the dongle and
upgrade from Notator SL to Notator Logic).
Matters concerning Logic do generally not belong in the Notator SL mailing list.
If you're interested in Notator Logic you can join the
Logic-users mailing list instead:
http://groups.yahoo.com/group/logic-users/
(NOTE: NOT DONE YET)
-short story of Emagic and C-Lab here...
-Not supported any longer, no more upgrades available
-making it available as freeware? (several Notator users have tried
contacting them, asking about this but have received negative replies
or
none at all. No chance (at least not for now) for a freeware release.
- 1 Mbyte of RAM is the minimum requirement, but the
more the better.
This is especially true if you're using Notator SL since notation demands its fair bit as well. - A monochrome (black/white) high resolution monitor.
The most common type being Atari's own SM-124 (12" display screen) which is reported to be one of the very best monitors around due to its extremely clear and crisp display.
Atari also made a few other mono monitors (SM-125 and SM-144 among others), but this model is the most common one.(A colour monitor (or a TV) will actually work with Notator, but is not recommended as the fine graphic details were designed for a high resolution monitor in mind and will put a strain on your eyes and look distorted as well.)
Besides, if you plan to use other MIDI related programs in addition to Notator you will find that most of them will refuse to work with colour monitors!
The general rule for Atari software is that games are made for colour monitors (and TV sets if your Atari ST is equipped with a TV output connector), while "serious" applications such as MIDI software, word processors, databases and so on only work with monochrome monitors. Some programs work with all monitors.Just for the record: there is no such thing as a high-resolution colour monitor for the Atari ST (not counting the various graphic cards available, which can't be used with Notator anyway).
Colour monitors (or TVs) work in medium/low resolution (640x200 pixels with 4 colours and 320x200 pixels with 16 colours respectively),
while monochrome (mono) monitors run in high mode (640x400 pixels, black/white).PS. It's also possible to use standard PC type monitors with the Atari ST, as high-resolution monitor replacements, by taking advantage of Mario Becroft's "ST VGA monitor adapter".
The display will still be black/white of course, but now you can use any type of standard VGA monitor, from LCD flat-screen types, large screen monitors, projectors and so on, instead of hunting down hard-to-find Atari monitors.For more information have a look at this site:
http://gem.win.co.nz/mario/hardware/stvga.html.... or you can build one yourself:
http://www.notator.org/html/contributions.html#st_vga(Be sure to check the specifications of the monitor first, ensuring that it can handle the vertical refresh rate of 71.2 Hz and horizontal rate of 35.7 KHz which the Atari ST outputs in "ST high" mode).
- A double-sided (DD) disk drive.
Most Atari ST computers around have double-sided (DD) 3.5" floppy disk drives which are capable of storing 720 Kbytes on a DSDD (double-sided, double-density) floppy disk, but a few of the earliest machines had single-sided disk drives, only capable of storing 360 Kbytes.
As the Notator software comes on 720 Kbyte disks (and you won't even have room for all the files needed on a 360 Kbyte floppy disk, you should replace it with a 720 Kbyte disk drive.Actually you might even want to use a high-density (1.44 Mbyte) disk drive while you're at it, since DD disks are a lot harder to find than HD disks.
Costs considering though, it might be cheaper just buying another Atari ST (the Atari STe being the most attractive buy as it's easy/cheap to expand the memory, they all come with DD disk drives, and have a well working TOS operating system which is also easy to upgrade if needed).
No, unfortunately Notator can't take advantage of these more powerful and modern machines because it relies on the combination of specific hardware (i.e. the Atari MIDI ports which are not present on other computers) and software routines which are only found in standard Atari ST computers:
- Atari ST
- Atari STf
- Atari STfm
- Atari Mega-ST
- Atari STe
- Atari Mega-STe
- Atari STacy
- Atari STBook
(out of the "standard" Atari ST computers, the Atari STe would be the most attractive buy as memory expansion is cheap and easy (30 pin SIMMs) whereas expanding an ST, STf or STfm can end up both expensive and complicated -often needing a technically qualified person to do the job).
Notator will not work with modified Atari STs where hardware accelerators, graphic expansion card upgrades or alternative operating systems have been installed. Certain ACCessories, AUTO programs and CPX modules may also cause conflicts, so some of these have to be disabled or re-ordered. Read on...
To fully take advantage of the Atari ST you can't get away from the fact that you will have to add certain "extras" to your computer, adding new features or enhancing/improving the ones already there.
These extras come in the form of auto programs (programs
residing in a folder named "AUTO" which run when the computer is
started and stay in memory), accessories (programs with the extension
.ACC, residing in the root directory, available to the user at any time
by going to the top left hand corner),
and finally CPX modules which are small programs which all go into the
new "Xcontrol" control panel accessory, doing away with the old method
of having a bunch of accessories, each one for one task (Xcontrol only
takes up one ACCessory slot, but can have a whole bunch of small
programs available).
All of these can add very useful and important functions to your
machine. They could be general settings for your computer, a
calculator, corner clock, mouse-accelerator, screen-saver, a
file-selector replacement, printer control panel and the list goes
on....
Programmers constantly find new and better ways of doing things,
improving on the operating system and adding new functions which can
save the user time and make the computer a lot more enjoyable than
using it "out of the box".
The problem is that in the past, a lot of programmers invented
their own programming guidelines because Atari were reluctant to give
out information about these "rules" at first, or pure
laziness/ignorance.
The result is that some programs don't work very well (if at all)
together with other programs.
Notator is a very picky program when it comes to extras like these because it bypasses so many Atari programming guidelines and makes up its own rules. It has often been said that Notator was designed for a "clean" system, but in practice this is not very practical for those of us who want to get the most out of our computer systems and use it for a variety of things, so in many cases a compromise has to be made.
This essentially means that if you're unlucky and have ended up
with a combination of programs which Notator is unhappy with (very
common) you'll have to spend some time re-organizing those extras so
that you can continue using them for your benefit with other programs,
and also have them working with Notator.
This may be time consuming, but once done it's well worth it!
(Setting up a list over which ACCessories, CPX modules and AUTO programs work and don't work with Notator is impossible since it not only has to do with these programs individually, but also the combination with other programs. Besides, there are hundreds of programs to choose from. The only way is to try them out on your system and if you're having problems, take some time to find a solution).
Troubleshooting
software-conflicts
Here's a short explanation of what to do in case you've been getting
problems with Notator after having installed extras to enhance the
system:
- Disable all AUTO programs, ACCessories and CPX modules
This insures that you start from scratch and doesn't confuse things even further. Disabling these programs is simply a matter of renaming the filename extension (i.e. change .PRG to .PRX, ACC to ACX, and CPX to CPZ. - Test Notator on a "clean" system
To insure that the above programs are in fact causing the problems and not that your Notator program (and associated files) is damaged, the dongle connector is loose or suffering from bad contact etc. it's well worth testing Notator out on a system where it runs all on its own. - Enable the extras one by one
One by one you should enable the extra programs again. It's a good idea to find a pen and paper here, taking notes of which programs you've enabled so you don't get "lost" (you can often end up with quite a few ACCessories, AUTO programs and CPX modules). - Reboot the system and try out Notator
After having enabled a new extra program you have to reboot (restart the computer) and run Notator to see if you've found the offending program or not. To save time you might want to enable 2 or 3 extras at a time, only to keep track of which ones you've enabled by writing them down.You'll surely benefit from having a harddisk when re-trying Notator again and again! Starting Notator and everything else only takes a fraction of the time a floppy-disk based system does. But then again a floppy-disk based system would be a lot simpler with perhaps only a few ACCessories and AUTO programs as there is limited space on a disk.
Note that there are two ways of rebooting the system; a "warm" boot, or a "cold" boot:
- Warm boot: pressing the reset button on the back
of the machine, or pressing the following combination of keys:
Control-Alternate-Delete.
- Cold boot: actually switching off the computer (the power switch on the back of the machine), then on again (wait 10 seconds or so) or pressing the following combination of keys: Control-Alternate-Right Shift-Delete.
(The latter key combination does not work on all Ataris -it depends on how old your TOS version is).
Sometimes (mostly after serious crashes) Notator (or the computer in general) won't work properly until you do a "cold" reboot, to flush out even the bits of the programs which don't go away after a normal "warm" reboot. But for the most part, warm reboots will do.
In extreme cases you might also have to switch the computer off, leave it off for around 30 seconds (to be sure that ALL memory has been cleared), then switch it on again. - Warm boot: pressing the reset button on the back
of the machine, or pressing the following combination of keys:
Control-Alternate-Delete.
- Repeat steps 3 and 4 until Notator refuses to work
When Notator refuses to work it means that the last program you've added is somehow incompatible with it. If you've added several programs each time it means that it has to be one of the two or three programs you've added since last time -this is where pen and paper comes in handy.
You need to find out exactly which program is the offending one, so go back, and try adding one program at the time.Just because a program is refusing to work with Notator doesn't mean that you have to abandon it. Several programs just need to be executed in another order, and this is where AUTOsort comes in.
AUTOsort does just what the name implies. It re-sorts programs inside the AUTO folder, but also works with ACCessories and CPX modules if needed. - Re-sort the extras
Using AUTOsort, change the order of the programs in the AUTO folder (if the offending program is an AUTO program, which is most likely). AUTOsort can also be used to change the order of ACCessories and CPX modules, but this is not needed as often as with programs residing inside the AUTO folder:
After having changed the order around (try to do it systematically and take notes instead of just randomly replacing them), reboot the system again as you've probably done quite a few times and check if Notator accepts the re-ordered execution of those programs.
Repeat until you have a working setup. You might have to give up with some programs as they are in fact totally incompatible with Notator. The fact may also be that they do indeed work with Notator, but not in the combination with other AUTO programs! If in doubt, ask other users in the Notator mailing list and Atari newsgroups. Who knows -there might be other extras around which do the job even better and even retain compatibility with Notator!
- Continue with the other group(s) of extras (if any)
When you've successfully made a working setup with all the AUTO programs you need you can move on to ACCessories and CPX modules. The procedure is the same: enable (add), reboot and test Notator.
No, Notator was designed long before these replacement operating
systems were available and will not work properly with any of them (if
at all).
As with the Atari ST hardware, Notator is highly dependant on standard
TOS (The Operating System).
The reason for all of this is because Notator relies on certain
programming routines in TOS, some which are bypassed and enhanced to
make it the powerful MIDI system it is.
Use Notator only with plain TOS. The latest one available is
version 2.06, but Notator works with just about all TOS versions though
it is advisable to upgrade if you have a
really old one since these contained a lot of bugs and several
functions were not present as they are with the later versions. But if
it works for you and you're happy with it there is no need to change!
Upgrading TOS is a matter of exchanging the ROM/EPROM chips inside the machine and usually means that a qualified technician has to do the job.
Notator SL, Creator SL and Notator Alpha are all commercial, Copyrighted programs even though they're not supported any longer.
There were some pirated copies circulating around a while back
and even
though these seemed to work they didn't always work reliably (how would
you like to loose your all your work in the middle of recording your
masterpiece just because the program crashed or refused to work any
longer?).
Naturally there was no manual with it either, which is quite essential
when you're dealing with such an advanced piece of software (the manual
is about as thick as a phonebook with lots of illustrations and
examples).
Last, but not least it's illegal.
A lot of Notator users are now selling off their Atari
investments for very little money, being attracted to PCs or Macs with
their harddisk recording capabilities and more fancy displays etc.
This is good news for the rest of us who know that Notator is still a
very capable system.
In fact, many professional musicians who can afford anything prefer
Atari ST computers because of their reliability, ease of use and the
tightest MIDI timing available on any system!
All of this is good news to those who aren't bitten by PC or Mac
envy as a complete system with an legal, original copy of Notator (with
the manual, disks and dongle) can be bought for next to nothing!
Look around in Atari and MIDI/music newsgroups on the Internet,
classified ads in newspapers, music magazines, local garage sales and
so on...
A lot of people consider Atari systems obsolete and "useless", so they
might pop up just about anywhere for little or nothing at all!
- The latest (and final) version of Notator SL is 3.21 which
you can freely download from:
http://www.notator.org/html/software.html#notator321 - The latest (and final) version of Creator SL is 3.16 and you
can download it freely by going to:
http://www.notator.org/html/software.html#creator316
PS. As always you'll need an original
Notator
or Creator dongle to use the above.
- Creator SL only works with the Creator dongle.
- Notator SL only works with the Notator dongle, or the Log-3 that comes as part of Notator Logic.
- If using the Log-3, DO NOT use the Notator dongle as having both inserted is unnecessary and can permanently damage the hardware!
- Which version of Notator or Creator you're using is irrelevant to the dongle. Just make sure you use the right dongle for the program it's intended for.
Many Notator users have two (or more computers): the Atari ST for MIDI, and a PC or Mac for everything else, which includes Internet access. This in turn means that when downloading any of the Notator/Creator updates or other Atari tools or programs, they have to be somehow transferred over to the PC, Mac or whatever. Luckily this is a simple task as Atari designed the ST computer to be able to read/write standard MSDOS floppy disks!
Most Atari ST computers come with built-in 720 Kbyte (DD) disk
drives. Some of the very latest models even support 1.44 Mbyte (HD)
disks.
Very early models however came with single-density (360 Kbyte) drives,
and these aren't suitable for exchanging data with most other
computers. You will need to exchange the drive with one being able to
read/write DD (720 Kbyte) disks first. For more information about this,
read the Atari ST quick-FAQ (Frequently Asked Questions):
http://www.notator.org/files/hall/info/quickfaq.zip
(downloadable zip file
containing the HTML and text version so you can read it offline)
or at...
http://quickfaq.atari.org
(online HTML version)
Again, if your ST is a very old model you might be better off buying a more modern machine (i.e. Atari STe or Mega STe) as used machines can be bought (or given!) for very little money these days.
If your Atari ST has a 720 Kbyte disk drive then read on....
Files transfers (Windows)
- Format a 720 Kbyte (DD) floppy disk on your PC or Atari ST.
Remember to use DD (720Kb) disks, and check that the computer formats to this mode and not "high density" (1.44 Mbytes) which is probably the default setting. As 720 Kb floppies are harder to come by these days you may be tempted to "cheat" by covering the HD detect hole of a HD floppy with tape and then formatting it to 720 Kbytes. Don't!!!! You'll risk loosing data this way as the magnetic layer is different between the two types. If you really don't have or can find any DD floppies you're better off upgrading to a HD disk drive in your ST.
You can also format the disk on your Atari ST using a program such as Hcopy:
(It's possible to format disks directly from the Atari desktop, but I'd advise against using it. My personal experience is that it doesn't do MSDOS properly and is slow and cumbersome). - Save the files to the disk on your PC.
Be sure to stick to the old MSDOS standard with filenames having no more than 8+3 characters, no spaces and no special or non-English characters (names such as "MYSONG.SON" and "PIC1.GIF" are OK while "a description of my studio.text" and "Büchsenöffner.gif" are not).
Lower/UPPER case lettering on the other hand is irrelevant as the Atari ST reads them as UPPER-case anyway.
At this stage you may also want to decompress the files (i.e. if the files you've downloaded are .ZIP files as used with all files at the Notator website) using one of the programs mentioned in step 4 below. - Read the disk on the Atari ST.
You can also save files to the disk and transfer it back to the PC again. Once the disk has been formatted using the MSDOS standard you can use that same disk on both computers. - Decompress the files on the Atari ST.
If you've downloaded the Notator/Creator updates or anything else from the Notator website you've probably noticed that they're all Zip compressed to save space and download time. Before you can use the contents you need to decompress them.
This can either be done on the PC before saving the contents to the floppy disk, or the Zip file can be saved to the floppy disk and be decompressed on the Atari ST. Choose whatever is most practical for you.
On a PC you can use Winzip, PKzip Alladdin Expander etc.:
- http://www.winzip.com (WinZip)
- http://www.pkware.com (PKzip)
- http://www.stuffit.com/expander/index.html (Alladdin Stuffit-expander)
Files transfers (Apple Macintosh)
If you're using an Apple Macintosh you can follow the same step-by step guide above, on how to transfer files from a PC
...but there are a few things worth mentioning, so read on....
All up-to-date Macs have "PC Exchange" as part of the operating system which allows you to read, write and format standard MSDOS floppy disks (HD and DD formats). Older Macs may not have this as part of the operating system, but additional software can be installed to make this work (refer to Mac specific newsgroups or search the web for this).
To decompress the Zip-files on the Mac you can use ZipIt, Stuffit Expander, MacZip etc.:
- http://www.maczipit.com (ZipIt)
- http://www.stuffit.com/expander/index.html (Alladdin Stuffit-expander)
- http://www.vampiresoft.com/Products/MacOS/SmartZip.html (SmartZip)
- Not enough room on disk?
You may have downloaded a program which is said to occupy a single disk, but before you're done transferring the files over to the disk you're told that the disk is full!! Why?
MacOS stores information about window size/position, text or icon view etc. as invisible files on the disk. You can't turn this off, so if you run out of disk space you need to spread the files over several disks.
When you insert the disk into the Atari ST you will notice a few strange files and folders that you didn't see on the Mac. You can delete them on the Atari ST if you like as they have no purpose there and just take up valuable space. The files can have names such as: "FINDER.DAT", "DESKTOP", "RESOURCE.FRK", "OPENFO~1".
If there are folders on the disk you should also look inside of them for Mac-specific files that can be deleted. - Files aren't recognized on the Atari ST?
MacOS determines which programs each file belongs to in another way from what PCs and Atari STs do. On the Apple Mac you don't need to give files a "last name" (i.e. ".TXT", ".WAV", ".GIF" etc.), but on the Atari ST they are needed.
If the files you're transferring have been created on the Mac and you haven't given them "last names" (extensions), be sure to do so before transferring them.
Files transfers (other platforms)
You may be using a PC running Linux or BeOS, a UNIX mainframe or something else...
Well, as long as the computer can read/write to MSDOS formatted 3.5" floppy disks (in DD mode, 720 Kbytes) you shouldn't encounter any problems. Just follow the step-by step guide above, on how to transfer files from a PC.
Refer to newsgroups and web-searching to find a suitable Zip
format decompression program for your platform. Info-zip is one program
which is available for a range of platforms:
- http://www.info-zip.org (Info-zip: several platforms)
- http://www.stuffit.com/expander/index.html (Alladdin Stuffit-expander: Mac, Windows, Linux, Solaris)
Problems reading transferred text files
Provided that you've followed the steps above you should have no problems sharing files between the different computer platforms (images-files, sound-files etc.).
You might however run into problems with some "plain" (ASCII) text files.
The idea is that an ASCII text-file on one computer should be readable on any other computer which is true, but with a few exceptions. There are solutions however...
End-of-line characters
There are basically 3 ways a computer defines the end of a line in a
text file:
- CR/LF (Carriage-return/Line-feed): Atari ST, Windows, MSDOS
- LF (Line-feed): UNIX, Linux
- CR (Carriage-return): Apple Macintosh
So, what does this actually mean in practice?:
- Text files written on a PC read fine on an Atari ST (with a few exceptions -see below).
- Text files written on a Mac: when double-clicked and viewed from Atari ST desktop, text will appear to be totally messed up with text overlapping each other. Unreadable and needs to be converted.
- Text files written in UNIX/Linux: when double-clicked and viewed from Atari ST desktop, text will appear to "fall down" vertically on one side of the screen. Unreadable and needs to be converted.
The solution?
- http://www.notator.org/html/software.html#blinex
("Blinex" (for the Atari ST) converts "end-of-line" characters between
various computer platforms so they can be read on the Atari ST).
or...
- http://www.notator.org/html/software.html#txcv_2st ("TXCV 2 ST" (for the Atari ST) converts "end-of-line" characters from Mac and UNIX/Linux so they can be read on the Atari ST.
Line-breaks (hard/soft
wrapping)
Many PC text-editors (such as "NotePad" which comes as part of Windows)
and some Mac editors as well (such as "SimpleText" which comes with
MacOS) won't insert line-breaks ("hard wraps") when saving a file.
Instead they rely on the reader's editor/viewer to dynamically
"soft-wrap" text according to the width of the screen.
This creates a big problem when viewing the file on an Atari ST as
you'll only see parts of the text file because it simply gets too wide
(the normal Atari ST screen is limited to 80 characters and doesn't
wrap text on its own).
The problem can easily be solved by using:
- http://www.notator.org/html/software.html#txcv_2st ("TXCV 2 ST" (for the Atari ST) "hard-wraps" text files that have previously relied on "soft-wrapping", and in addition converts from Mac and UNIX/Linux end-of-line characters so they can be read on the Atari ST.
Character-set remapping
ASCII (American Standard Code for Information Interchange) was
developed in the United States without any regards for the rest of the
world. As computers become more accessible to people around the world,
so became the need for support of non-English characters, accented
characters, special symbols etc. and these were added to the existing
ASCII character set.
Unfortunately no common standard was followed, so the character ä
on a Mac translates into ÿ on a PC, and Ñ
on an Atari ST!
(Fortunately, standards have been set when it comes to exchanging
information over the Internet).
If the ASCII text file on your Mac or PC contains non-English
characters you'll need to "remap" the character set so that the same
letters/symbols are shown on the Atari ST as well:
- http://www.notator.org/html/software.html#blinex ("Blinex" (for the Atari ST) remaps character sets between different computer platforms so that non-English characters/special symbols etc. are displayed correctly).
Sooner or later you will experience limitations, or simply want
to add more functionality to your system.
Most of the following is applicable for any serious Atari user, but
explained here specifically with the Notator user in mind.
Atari ST related
newsgroups
(For more detailed information beyond what is explained here I suggest
you contact the Atari newsgroups:
comp.sys.atari.st (for general
Atari ST discussions)
comp.sys.atari.st.tech
(for hardware related issues)
If you don't have access to a newsgroup-server via your Internet
provider you can still access them via the web, using Google-groups:
- http://groups.google.com/groups?hl=en&group=comp.sys.atari.st
(for general Atari ST discussions)
- http://groups.google.com/groups?hl=en&group=comp.sys.atari.st.tech (for hardware related issues)
Atari ST related web-sites
...search for information on Atari related web pages -a good place to
start is the Atari Launchpad:
- http://www.geocities.com/SiliconValley/Bay/8745/ (United States)
- http://gem.win.co.nz/hall/ (New Zealand)
- http://atari.nvg.org/launchpad/ (Norway)
The Atari ST FAQ (Frequently
Asked
Questions)
...and read the various Atari FAQs (Frequently Asked Questions), such
as the Atari ST Quick FAQ:
http://www.notator.org/files/hall/info/quickfaq.zip
(downloadable zip file
containing the HTML and text version so you can read it offline)
http://quickfaq.atari.org
(online HTML version)
Other FAQs and documentation is available from the Atari
Launchpad info/help page:
http://www.geocities.com/SiliconValley/Bay/8745/pages/faq.html
A newer TOS version
If you have one of the earlier Atari STs, chances are you have one of
the first TOS versions as well, which in turn means more bugs and
problems.
(TOS stands for the rather unimaginative "The Operating System" which
is the equivelant of Windows or Linux for a PC, MacOS for an Apple
Macintosh, UNIX for a mainframe etc.).
The latest (and final) version for an Atari ST is 2.06.
To find out which version you have, use a program called Profile:
Explaining which bugs follow which version and how this affects you is a subject on its own and is best discussed in one of the Atari newsgroups.
More memory (RAM)
A computer with a decent amount of memory means that your musical
inspiration won't have to be limited by the computer's hardware, giving
you messages such as "no more memory".
2 Mbytes of RAM is recommended for Notator SL users, but with the low
price of computer memory these days (thanks to the memory hungry PC
market) you may as well go all the way up to the 4 Mbyte limit.
Older models of the Atari ST will probably require a qualified dealer to install the extra memory inside your machine as it requires some work to do while newer versions of the Atari ST (the STe and Mega-STe) allow the user simply to install readily available 30-pin SIMMs (Single Inline Memory Modules) to be plugged into slots inside the machine and can easily be done by the owner.
Since some memory upgrades can become quite expensive you might
actually want to consider buying a used STe (or Mega-STe) instead as
this might in some cases become a better, more cost-effective solution.
The STe models also feature other improvements over older STs.
The Atari newsgroups may be a good place to start asking about the
specifics of these things in case you plan to do your own memory
upgrading of an older Atari ST, or need some help or other suggestions
on this subject.
A harddisk
If you're more interested in making music than shuffling disks around
you'll want a harddisk sooner or later!
Besides having all your files and programs stored in one place,
loading/saving files will work a lot faster (starting Notator SL from a
floppy disk takes around a minute while from harddisk it only takes
around 15 seconds).
A harddisk will also let you customize your system with useful extras
(screen saver, mouse accelerator, file-selector replacement etc.) which
you wouldn't be able to do on a disk-only system without a lot of extra
effort.
Harddisks used to be prohibitively expensive, but prices have
dropped drastically since the Atari ST first came out in 1985 (with
typically 20 and 40 Mbyte drives) -thanks again to those disk-hungry
PCs!).
SCSI drives in an external box (with a power supply and cooling fan)
connected to the Atari ST via an SCSI to DMA adapter is the usual way
to go.
DMA problems with Atari STe
Some of the first Atari STe machines that rolled out of Atari's factory
came with a malfunctioning DMA (Direct Memory Access) chip,
affecting a connected harddisk in such a way that data would become
corrupted. Quite a serious mistake! Apparently these machines still
worked fine with Atari's own harddisks (though I make no guarantees),
but with regular SCSI disks connected via an SCSI host adapter (Link,
Link II, Link 97, TopLink etc.) you would definitely get problems.
To determine if your STe has a faulty DMA chip (which needs to be
replaced before attaching a harddisk) you need to open up your machine
and locate the chip, which is found close to where the disk drive is.
If you find a chip marked as follows you're OK and can go ahead
with a harddisk:
C398739-001A (Atari-1990)-31
However, if you find a chip marked with the numbers below you
have a damaged DMA chip and need to get a new one before
attempting to use a harddisk via an SCSI host-adapter:
C025913-38 PH23-001A
SCSI host-adapters
The most popular SCSI adapters are the "Link" and "Link II" by ICD
Incorporated:
http://www.icd.com/
BEWARE!!
ICD incorporated have reportedly been involved in scams, where people
having sent payment to them never received any goods in return! (see: http://www.eta.org/catbox/).
So you're advised NOT to buy anything from this company.
On the other hand, buying second-hand from private individuals is
another matter as these devices work fine.
There's also "Link 96"/"Link 97" (as well as other host
adapters) by WB Systemtechnik:
http://www.wbsystemtechnik.de/atari/in_e.htm
(these host adaptors are highly recommended as they support more SCSI
devices than other (older) adaptors).
By using one of these adaptors connected to the DMA (Direct Memory Access) harddisk port on the back of the Atari ST, just about any SCSI device can be connected to the computer, provided you have software that supports it (read about HDdriver below).
Internal IDE harddisks
There are also solutions involving small (2.5") IDE drives (intended
for portable computers) which actually go inside the Atari ST itself!
The result of this is a very compact machine with no extra cables, SCSI
adapters or external cases needed, and possibly also a quieter machine
because of the smaller harddisk and no cooling fan.
Mario Becroft in New Zealand provides several hardware
enhancements for Atari ST computers and among them is one such IDE
harddisk interface.
For more information, check out the following website:
http://gem.win.co.nz/mario/hardware/ide.html
(he has dealers all around the world, so you should probably find one
close to where you are located).
Harddisk drivers/software
For software to set up harddisks so they can be used you can always use
'AHDI' from Atari which is free, but old, outdated, slow and
lacking features.
A much better alternative would be 'HDdriver' from Uwe Seimet,
an excellent piece of software which supports all major harddisks and
even Iomega Jaz, Zip and other removable storage devices.
HDdriver is actively supported and updated all the time, meaning access
to the latest hardware. Comes highly recommended!
More information about HDdriver by going to:
http://www.seimet.de/hddriver_english.html
Harddisk noise problems
It is worth noting that harddisks generally add some noise to the
working environment and can (but not necessarily) pose a problem to the
working musician.
Exactly how much noise depends on the harddisk model used, placement
and the subjective impression of what is annoying. This noise is
generally in the form of a constant "whizz" from the electric motor and
cooling fan inside the harddisk unit, and the "ticking" sounds emitted
when data is found/saved.
Even though noise is an issue to be considered (especially for a
musician trying to concentrate -or anyone else for that matter) you
should not be discouraged from getting one.
Unlike other computers accessing the harddisk just about all the time,
you can easily switch off the harddisk on an Atari ST when Notator (and
your work) has been loaded and leave it until you are ready to save
some more work. But do remember to do "incremental" saves, meaning that
you save your work now and then and not wait until your complete
session is over, which would be disastrous in case the computer
crashed, you had a power failure or other problems.
(switching off the harddisk is explained in further detail in section 13 of this document).
Iomega Zip-drives -an
alternative to
hard disks
The 250 Mbyte Zip-drives from Iomega have been a success for several
Notator users as they've proven to be almost as fast as hard disk
drives, but only give off a very low noise-level, making it ideal for
musicans (or anyone else for that matter).
The downside is of course that you don't get to store as much on each
Zip disk as you'd do with a modern hard disk, but then again you go
pretty far with 250 Mbytes on an Atari ST!
You can read more about Zip-drives and Notator users by going to
the 'contributions' of this website:
http://www.notator.org/html/contributions.html#zipdrive
A printer
If you're using Notator SL you probably want to print out your musical
scores on to paper.
The result (depending largely on the printer used of course) is quite
impressive to say the least!
Dot-matrix printers used to be the norm in the 80s, but these
days it's inkjet or laser.
Hewlett Packard's Deskjet 500 seemed to be the official printer to be
used with Notator SL as it was always featured on brochures from C-Lab,
and was (and still is) a very good printer, but is no longer in
production.
Notator SL comes with configurations for several printers, so most standard printers can be used.
(One of the list members has reported that the Deskjet 500
printer
drivers that come with Notator seem to be "upwards compatible", meaning
that Hewlett Packard printers currently available may even work with
it!
Many printers sold today are unfortunately only PC/Windows compatible,
so it is advisable to ask other Notator and/or Atari users if the
specific printer in question can be used before you actually buy it).
A new mouse
I guess I don't even have to mention how terrible the original Atari
mouse is! It feels more like a brick, by the shape and its weight, and
takes a lot of moving around to make the mouse pointer go from one end
of the screen to another.
The latter (mouse resolution) can be greatly improved by
installing mouse acceleration software on the computer, such as
"Silkmouse":
(actually, Notator has a "Dynamic mouse" function built-in, which can be selected from the "Flags" menu. Naturally, this only works with Notator and not from the desktop or with other programs you would use your computer for).
So, in the long run, a better, replacement mouse comes highly
recommended. Modern replacement mice are available from many Atari
dealers, such as:
The Atari Workshop (UK):
http://www.atari-workshop.co.uk/
Best Electronics (USA):
http://www.best-electronics-ca.com/
Woller & Link GbR (Germany):
http://www.inx.de/w+l/atari.htm
...and several other dealers selling Atari hardware/software.
For a list over many such dealers, point your web browser to: http://www.geocities.com/SiliconValley/Bay/8745/pages/dealers.html
Actually, mice made for Commodore Amiga computers can be used as well, simply by rewiring them a bit, though most Atari and Amiga mice are interchangeable as they come with an "Atari/Amiga" mode switch underneath.
Unfortunately, because of the rather limited Atari market
(compared to the PC/Mac community) mice are often hard to come by,
while PC mice can be bought at just about every street corner.
The downside is that they can't be used with Atari ST computers.... or
perhaps they can!
Well, since PC mice are "serial mice", they can be connected to the
serial (modem/RS-232) ports of Atari ST computers, though this is no
good if you have a standard ST or STe as it only comes with one modem
port anyway. You might have it occupied already with a modem or an
"Export" device for use with Notator.
With a Mega STe however you have several modem ports, and with the
right mouse-driver software, a standard PC mouse can be used.
For those of us with just one modem port there's still a
solution....
Mario and Brian Becroft to the rescue again, as they've made an
interface which attaches to the existing mouse connector and allows for
just about any PC mouse or trackball to be used. For more information,
go to the following website:
http://gem.win.co.nz/mario/hardware/mouse.html
They also make an interface which incorporates the above, but
also allows for a standard PC type keyboard to be used with the Atari
ST. This comes in handy if your keyboard is worn out, or you want to
recase your ST in a PC type "tower" case, or even a 19" rack unit which
would be perfect for musicians on the move!
For more information about the PC mouse/keyboard interface, go
to:
http://gem.win.co.nz/mario/hardware/qwertyx.html
A battery-backed clock
Tired of having to set the time/date each time you power up the
computer? Or perhaps you've gotten so tired of it that you just don't
bother any longer?
Atari made a huge mistake in not including a battery backup for
the clock in my opinion, but they probably tried to cut every corner in
the design process (the Mega ST and Mega STe computers come with
battery-backed clocks).
It's often useful to see when a file has been created, and without
setting the time/date you'll end up with a file date of something like
"00-00-28". Not exactly informative!
Instead of having to set the time/date for each session, an internal,
battery-backed clock can be installed in the computer, keeping the time
even when the computer is switched off. There are also cartridge type
clocks (with a "thru" port for other cartridges such as the Notator
dongle), but I personally prefer the internal type instead of having
things sticking out here and there, even though this means having to
open up the machine to connect a few wires etc.
Contact your local Atari dealer and ask if they sell battery-backed clocks.
A replacement or bigger (PC)
monitor
Atari's own SM-124, SM-125 or SM-144 monochrome (black/white) monitors
are very crisp and clear, good on the eyes and even have built-in
speakers. But they are a tad small. Especially with that black border
(for the technically inclined, the monitor can be adjusted to eliminate
the border, enlarging the picture. But if done incorrectly, it can make
the picture fuzzier and shorten the life of the monitor. It can also
seriously threaten your life if you don't know what you're doing as
we're talking thousands of volts inside the unit, so don't attempt this
if you don't know exactly what you're doing!).
Atari monitors are hard to find these days, given that Atari as a company is no longer around and existing Atari users seldom want to part with theirs.
However, with relatively little effort, a standard VGA or SVGA
monitor from a PC can be used for this purpose. First, check and make
sure that the monitor is able to handle the vertical and horizontal
frequency rates of the Atari ST's "high" (black/white) mode. You'll
find the relevant numbers in the table below.
Most PC monitors sold today handle this, but to be on the safe side
check to be sure.
In addition to the monitor you need to buy (or build) an adapter cable
as the connector on the Atari ST is different from what you'll find on
a PC.
Mario Becroft in New Zealand sells these ready built and tested. Check
out their website for more information:
http://gem.win.co.nz/mario/hardware/stvga.html
.... or you can build one yourself:
http://www.notator.org/html/contributions.html#st_vga
There are several benefits to using a PC monitor instead of a genuine Atari black/white monitor: first you can buy a PC monitor cheap almost anywhere. Secondly you can get them in different sizes, meaning you can now get a 17" or 19" monitor which gives a much bigger picture than what you're used to with the small 12" or 14" monitors from Atari! Finally you can save space: in case you won't be using both computers at the same time you could get hold of a switch-box which allows you to select which computer should be using the monitor.
(Note: a general misconception is that a bigger monitor gives
room for
more windows with a bigger desktop. This is not the case here. The
picture just gets bigger. Imagine putting a huge magnifying glass in
front of the small Atari monitor -that's what you'll see. No more
squinting to see those tiny notes. If you really want to "get the big
picture", connect the computer to a screen projector and get a giant
display on the wall!
Another misconception is that with a colour VGA/SVGA monitor you'll get
a colour picture. This is wrong. The Atari ST doesn't send any colour
signals out for the high resolution screen mode, so even with a colour
monitor you'll see everything in black/white).
|
|
||||
| Mode | Size (horizontal/vertical) | Colours | Horizontal frequency | Vertical frequency |
| High | 640 x 400 pixels | 2 | 35.7 KHz | 71.2 Hz |
A minor drawback is that most PC monitors don't have speakers
built into them as the Atari monitors do, but a connection to an
external PC speaker will do nicely. You'll get the audio output signal
from the same monitor connector that goes into the Atari ST.
The only real use for audio feedback in Notator is the metronome click.
However, this click can be assigned through MIDI, sending a steady
"click" signal to any note or channel you like (i.e. a cowbell or clave
on a drum machine or sampler). Go to the "MIDI" menu to set it up and
turn this option on.
If you like, you can save the current "AUTOLOAD.SON" and have these
settings as default each time you run Notator....

Notator allows you to output the metronome click as MIDI,
eliminating the need for the monitor's speaker to keep the beat while
recording.
Replace the disk drive
Most Atari ST computers came with 3.5" DD (720 Kbyte) disk drives.
Really old STs came with Single-sided (360 Kbyte) drives, while some
Mega-STs came with HD (1.44 Mbyte) drives, as used with modern PCs,
Macs and what have you.
This may mean that you're in the market for a new disk drive.
This is especially true if you have an ST with a Single-sided, 360
Kbyte drive where you'll only be using half the capacity of a DD (720
Kbyte) floppy disk.
You may also want to upgrade to a HD (1.44 Mbyte) disk drive because DD
disks are hard to come by these days as PC and Mac users buy HD disks.
DD disks are actually still available, so shop around, and when you
find them, buy as many as you need for a while. They may even cost more
than HD disks, but although it might be tempting to fool your computer
with HD disks where the extra "HD detect hole" is covered with tape,
you should never do this!
The magnetic coating between HD and DD disks is not the same, so you
might end up loosing data by "cheating". Not much fun when your
masterpiece goes down the drain (which might remind you to always take
backups as well!).
(PS. Atari ST computers can read and write disks in the MSDOS format, making them compatible with PCs and Macs, meaning that files can be interchangeable between platforms! More details about this in the section concerning transferring files between computers, elsewhere in this document)
Anyway, upgrading (replacing) your disk drive can be done,
either because your existing drive is worn out/damaged, or you want to
use higher capacity disks.
Many standard PC type 1.44 Mbyte (HD) disk drives can be used, though a
few steps have to be taken to insure compatibility. For 720 Kbyte use,
the upgrade is pretty straight forward, though a little "hacking" has
to be done. The procedure is more complicated for HD (1.44 Mbyte) use,
and more expensive as well, as a new disk drive controller chip is
preferred.
All of this is documented, and can be downloaded at the following
location:
http://www.notator.org/files/hall/info/sony_144.zip
Many Atari dealers can also do this for you if you're not comfortable with DIY (Do-It-Yourself) projects.
MIDI-port expansion
Notator is more than just a simple MIDI sequencer. Think of it more as
a complete MIDI workstation with more possibilities than most of us
ever need. And with such a system there often comes a demand for more
hardware.
With today's multi-timbral MIDI modules, one MIDI IN and OUT port just
isn't enough for many of us. There are also situations where you may
want to interface with the non-MIDI world, synchronizing to
tape-recorders, video, film and such.
Luckily, the programmers at Emagic had foresight for these things and
thus a line of (rather expensive) "black boxes" were made available.
Unfortunately, many of these boxes can only be bought second
hand nowadays and might be hard to find, but some of the units have
been made available by other companies as well, and work just as well
as C-Lab/Emagic's own original units.
A fully expanded system for Notator SL can give you up to 48 MIDI IN
and 96 MIDI OUT channels in addition to SMPTE sync and/or external
audio sync/VITC and so on. That should keep you busy for a while!
For more specific details about expanding Notator's hardware, go to section 16 of this document.
A hard disk (as mentioned above) is very handy because you don't have to worry about finding the right disk(s), not having enough space (though you will eventually get to this point even with a hard disk) and waiting for the file(s) to get saved/loaded.
But there is a downside: noise!
Because a harddisk is a mechanical device, where a platter spins around
at a high speed, and in addition, a fan is needed to cool it down, you
will get at least some noise (how much, depending on the kind of drive
used, how well the casing is isolated, fan noise etc.).
Switching the harddisk off
while
making music
Noise can be disasterous to a musician trying to focus on his/her
music, so what do you do if you want to keep the benefits of easy and
fast access to files, but at the same time do away with the unpleasant
noise? Well, there's a very simple solution to this problem (provided
you have an external harddisk which you can switch on/off -which is
most likely as only a few Atari users have internal IDE harddisks,
which, because of the smaller size might make less noise anyway).
Note: If you use HDdriver as mentioned below, a supplied ACCessory
allows you to switch off even internal drives.
- Switch on your computer and start Notator as usual.
- Insert a (formatted) floppy disk into the internal Atari ST disk drive.
- Go to the "File" menu, then save the
song/sequence/arrange/pattern etc. to the floppy disk.
Take care taking care to save to the floppy disk and NOT the harddisk! (simply select "A" from the file-selector as this symbolizes the internal floppy disk of the Atari ST) - Switch off the external harddisk drive. (phew!!!! the noise is gone!)
- The next time you load or save a file, the file selector
will locate the disk drive, and not the harddisk.
This way you can continue saving your work to the floppy disk for the whole work session (do remember to save as you go along, just in case of a power outage, computer crash etc.!!). - When you're done with all of your work, switch on the
harddisk again and save it to the harddisk.
Next time you want to locate the song/pattern/sequence etc. you have it organized on your harddisk as usual. (The floppy disk will simply be a temporary storage device).
If you use 'HDdriver' as your harddisk driver software
you can
use the supplied ACCessory to turn off your harddisk! HDdriver is the
absolutely best (and still supported) harddisk software available for
the Atari ST platform.
More information about HDdriver can be found by going here:
http://www.seimet.de/hddriver_english.html
Iomega Zip-drives for lower noise
Alternative storage devices may be worth looking into as well, either
for backing up data (which is something most people start doing AFTER
they've lost a lot of valuable data! ..perhaps you should start doing
this right now so you won't have to live with that risk), or for
eliminating (or at least lowering) the rather irritating noise that
comes from most hard disk drives.
The 250 Mbyte Zip-drive from Iomega may be worth checking out.
Notator users have praised it because of the lower noise level compared
to hard disks, and on an Atari ST at least they function more or less
like a hard disk anyway (250 Mbytes may not seem a lot today, but on
the Atari ST you can get pretty far with one of these disks. And you
can always buy additional Zip-disks later if you need to store more
data, though not accessible before you actually swap the disks of
course).
Go to the 'User contributions' page at this site to read more about it:
http://www.notator.org/contributions.html#zipdrive
You may have experienced the following: you load a song (.SON) file from the harddisk, and suddenly the disk drive starts up, where Notator searches for the fonts, even though you've installed all the fonts on your harddisk!
This is a typical problem for Notator users who have been using a basic Atari ST system (i.e. using floppy disks for saving files), then adding a harddisk later.
Song files (.SON) are saved along with all sorts of information,
among others the paths to where the fonts are located. If the songs
have been saved on a floppy disk system (i.e. drive "A"), naturally the
font path will be "A:\" as well.
So even when the songs are copied over to a harddisk, the font path
information is still pointing to the disk drive, not the new harddisk
path, and that's why the disk drive is accessed as the song is loaded
from the harddisk.
You can encounter similar problems if you've deleted (or renamed) the
"FONT" folder, or changed the path on the harddisk.
However, there is an easy fix to all of this, so that the songs
can find fonts on the harddisk, and leave the disk drive alone.
There are two ways to do this. The first way involves setting a
"filter" in Notator which loads all parts of the song except
the font settings, the second one a more permanent solution.
- Insert a disk in the disk drive. (any disk as long as it can be read by the computer)
- Go to the "File" menu and select "Load System".
- Select "Font Settings (NOTATOR)", which should make the words gray (de-selecting this particular part)
- Select "Load" (which presents you with the file-selector), and load the song.
- The song file will load, only this time without accessing the disk drive searching for fonts.
More time comsuming/permanent
solution
The second solution involves changing the path information and saving a
new version of the song, so that the correct path will be found each
time, ensuring a more permanent solution to the problem. Also bear in
mind that you should look at the "AUTOLOAD.SON" file first, as
explained in more detail below.
You may want to do this while you're working on an old song, updating it with new ideas etc., or perhaps even taking some time off to correct all your old songs' file paths. It's recommended that you take copies of the songs first, and fix them instead of the originals you have (just in case something goes wrong). Also bear in mind that when saving the songs, the old file-dates will be replaces by the new date, which makes it hard to see when you first created the song(s).
For the latter, there are programs which allow you to alter a file's time/date, so if you took a note of the original time/date of the file(s), you could fix the file paths, save the file, then alter the file time/date back to the way it was before. Quite a job (especially if you have many files to fix), but I thought I'd mention it anyway, for those of you who are perfectionists and like to have everything in fully working order.
Anyway, this is the way to fix a file's font path, making it work properly later on:
- Insert a disk in the disk drive. (any disk as long as it can be read by the computer)
- Go to the "File" menu and select "Load Song".
- When presented with the file-selector, load the song from the hard disk.
- The song file will load, followed by disk drive access, where Notator searches for the fonts belonging to the song. (It will either load the fonts from the disk if they are present, or complain about missing fonts. What happens here is actually irrelevant.)
- Go to the "Edit" menu, then to "Fonts"
- On the left hand side you will see a list of font names preceded with a letter. Point and click on one of the font names (any of the font names will do), and you will be presented with the file-selector, probably going to the disk drive (A:\).
- Using the file-selector, change the drive and path so that you end up with the folder on the harddisk where the fonts are located (should be called "FONTS"), then press "OK". (You should not select any of the fonts themselves as the font in question will pop up in the file-selector anyway and be found on the harddisk, assuming you've copied all the fonts over to your harddisk. You should only select a new drive and folder).
- You will return to the "Font Configuration" window, where you should press "OK". You only need to set the new path of one font as the rest will follow!
- At this point, one of several things might happen... If the fonts weren't found on the floppy disk while the song was loading, the fonts will start loading from the harddisk. If you had the fonts on the disk and they were loaded, nothing will seem to happen, though this is only because Notator doesn't need to load the fonts again.
- You are now back at the main window where you are ready to save the song with the correct font configuration. (while you're at it, you might also want to save some other parameters you're not happy with. Personally I find the "Dynamic Mouse" quite irritating as I now have a new, high resolution mouse as well as mouse-accelerator software for the entire computer, so I want to turn this off. I also dislike the "MIDI Click" and don't need "MIDI Thru Auto-Off Channel 1". Your mileage may vary, so set things up the way you feel comfortable and need the song to be).
- Save the song by going to the "File" menu, then "Save Song". Be sure not to overwrite the original song (in case something goes wrong), and do remember that a new time/date is given to the file, even though you probably still consider the song to be created at an earlier date.
(P.S.!!!! The file "AUTOLOAD.SON" is actually the root of
these
problems in many cases!
If present, Notator will load this "song" (which is actually more of a
settings file), and base whatever you start creating on these settings.
You should therefore insure that the settings of this file are correct
according to your needs and setup, such as the font path and other
important things, then save it, overwriting the existing
"AUTOLOAD.SON".
This way, you are insured that you won't be getting any more file
setting problems such as with the fonts.)
The Atari ST, although an old computer by todays standards is
still a very capable machine able to perform just about any task you
put it to.
Its age and limitations show up mainly in the hardware -most notably
the lack of high resolution colour graphics.
On the software side however you can get just about anything, so
the future for Atari enthusiasts seems to be the new clones (Atari
compatibles) with up to date hardware and emulators for Macs and PCs.
Many computer users who have tried several platforms actually prefer
the Atari (on some sort of modern hardware that is) because of its ease
of use, its speed (Atari software runs a lot faster than most
equivalents on both PCs and Macs when tested on the same hardware) and
its stability.
The downside to all of this is that software that hasn't been made
according to Atari programming guidelines won't work, which also
includes Notator, so keep your old Atari ST in any case.
You probably already know that the Atari ST was THE computer for
music (MIDI) when it was available.
PCs barely had any MIDI software at the time and Macs were too
expensive for most people.
Many professional musicians actually still prefer the Atari ST for MIDI
sequencing to other machines, mainly because of its extremely accurate
timing which means that MIDI output is rock steady, and people also
report that there is less fuss involved with it so that one can get
along with the music instead of trying to tame a stray computer with a
mind of its own so to speak.
Getting back to other tasks -a lot of Atari users like to use their machines for things like word-processing and Internet among other things. A lot of the software needed is available for free. New software is coming out all the time and a lot of older software is still being supported.
So.... what can this machine actually be used for? How can I expand the memory, add a harddisk, get online, get in touch with other Atari users?
Well, there are several web pages around in the (still very
active) Atari community as well as newsgroups and mailing lists.
You can start off by visiting my very own Atari Launchpad which
is meant to be a starting point on the web (hence the name) with all
sorts of subjects categorized and sub-categorized for ease of finding
things:
- http://www.geocities.com/SiliconValley/Bay/8745/ (United States)
- http://gem.win.co.nz/hall/ (New Zealand)
- http://atari.nvg.org/launchpad/ (Norway)
For starters you might want to download one of the several "FAQ"
documents (Frequently Asked Questions) similar to the one you're
reading right now, but specifically for the Atari ST computer.
You'll find links to all of them by going to the above site.
I recommend the Atari ST quick FAQ (http://quickfaq.atari.org)
for starters.
(The Notator mailing list isn't really an appropriate place to discuss Atari related issues unless they're directly related to Notator of course. If you want to find out how to add a harddisk to your machine, where to go to get a memory upgrade and so on the best places to go are newsgroups.)
(If you don't know how to subscribe to newsgroups ask your Internet provider who should have informed you about this to begin with. It's also hard to explain as there are so many news programs available for every computer platform).
The two main, most active Atari ST newsgroups are:
comp.sys.atari.st (for general
Atari ST discussions)
and....
comp.sys.atari.st.tech
(for hardware related issues)
Your Internet provider should carry these groups as they're very
common. If not, ask them if they can make them available.
If they still don't want to help out, fear not! You can still read (and
post to) just about any newsgroup available via Google-groups on the
web: (http://groups.google.com/),
the links directly to the Atari ST related groups being...
http://groups.google.com/groups?hl=en&group=comp.sys.atari.st
(comp.sys.atari.st)
http://groups.google.com/groups?hl=en&group=comp.sys.atari.st.tech
(comp.sys.atari.st.tech)
To accompany Notator and Creator SL, several "black boxes" were
sold by C-Lab to add extra features not available directly from the
computer.
All of this resulting in Notator SL being one of (if not THE) most
powerful MIDI recording systems at the time.
Although these boxes aren't in production any longer (because of the C-Lab's demise) replacements for some of them made by other companies can be found, unfortunately this doesn't include all of them, in which case one has to resort to the second-hand market.
| Export | |
Click for image (will open new window) |
In addition to port "A" which is the usual MIDI OUT connector on your Atari ST, outputs "B", "C" and "D" are added, totalling a massive 64 MIDI OUT channels!
Control for this is built into Notator so there's no need for any extra software.
But if you want to access MIDI units connected to those ports from within other MIDI programs (synthesizer editors and librarians etc.) without having to rewire your MIDI setup there is a little utility freely available from C-Lab called "Director". Download it from:
If using Export with a Mega-STe computer, you should buy a modem cable with a 9-pin connector at one end, and a 25-pin male connector at the other end. In other words: a commonly available PC type modem cable.
As mentioned above, Export is no longer available, but....
ExtraPorts
Cimple Solutions in the UK make an Export replacement they've called
"ExtraPorts" and works in just the same way as Export, giving the user
an additional 48 MIDI OUT channels for a total of 64 MIDI channels on
the Atari ST!
For more information go to:
http://www.cimplesolutions.demon.co.uk/prod1.htm#ExtraPorts
NoBoxe 48
Also in the UK is PadWorld, and they sell a MIDI expander like the
Export called "NoBoxe 48" which can be bought either pre-assembled or
as a do-it-yourself kit. More information available from:
http://www.padworld.demon.co.uk/dnarm.html#Noboxe
48
MIDI-3
And again, Mario Becroft has made another hit, with his "MIDI-3" unit
which, as the above units, provides 3 additional MIDI OUT ports (48
MIDI channels):
http://gem.win.co.nz/mario/hardware/midi3.html
| Unitor | |
Click for image (will open new window) |
It adds several functions to Notator. Continuing where Export left off it gives the user 2 additional MIDI OUT connectors ("E" and "F") and also 2 MIDI IN connectors.
This means that together with Export a total of 96 MIDI OUT channels can be used! (without Export you get 48 MIDI OUT channels).
2 extra MIDI IN ports mean that additional master keyboards or other MIDI controllers can be used, merging data from all 3 IN connectors simultaneously!
In addition to this, SMPTE/EBU lets you (very accurately)
synchronize your music to video, film, tape and so on.
Finally, this unit allows "Human Touch" or "Steady Eye" to be connected
-two other expansion devices which will be discussed shortly.
(There are 3 versions of Unitor: "Unitor C" and "Unitor N" for Creator SL and Notator SL respectively, since they had the dongle built into the unit, and "Unitor 2" which later replaced both of these as explained below.
When buying a Unitor unit you sent your dongle to C-Lab, and in
return received the appropriate Unitor ("C" or "N" version).
This created a problem for Creator SL users who wanted to upgrade to
Notator SL: it was possible to upgrade the program itself, but not the
Unitor unit, so a replacement was made available: the "Unitor 2" which
contained all of the above features except the Notator/Creator specific
dongle inside the unit.
Instead, the existing cartridge could be plugged into the unit by the
user.
(C-Lab offered upgrades from Unitor "N" and "C" to Unitor 2 when it
became available)
| Steady Eye | |
Click for image (will open new window) |
(Steady Eye needs Unitor and plugs into its "Multi-port" connector).
| Human Touch | |
Click for image (will open new window) |
Human Touch can also output audio click signals used mainly to synchronize older, pre-MIDI drum machines from Roland, supporting DIN-sync to Notator.
(As with Steady Eye, Human Touch needs Unitor and plugs into the
same "Multi-port" connector.
This in turn means that you can NOT have both Steady Eye and
Human Touch connected to Unitor at the same time -you have to remove
one to make room for the other).
| Combiner | |
Click for image (will open new window) |
In addition to Notator there are several other programs (from C-Lab/Emagic and others) using the dongle type copy protection method.
Combiner plugs into the cartridge connector of the Atari ST and gives you a total of 4 cartridge connectors and automatic switching (under SoftLink).
The "automatic" switching under SoftLink works in this way:
SoftLink lets you assign several memory
"partitions" where different programs are held (i.e. synthesizer
editors/librarians).
The number of each partition corresponds to the same slot number of the
Combiner.
SoftLink always assigns Notator to partition 1, so the dongle should
always be placed in this slot, or at the end of the (cartridge
connector) chain if a Unitor-2 or whatever is used (Unitor-C and
Unitor-N already have the dongle built in. The same goes for the
Log-3).
Another reason for placing the Notator dongle in slot 1 is because this
is the default choice of the Combiner (when the computer is switched
on, slot 1 is selected -otherwise you'll have to manually switch over
to the slot you have the dongle inserted in).
For other programs, if they're dongle-based (i.e. copy-protected with a
dongle), look at which slot the dongle is in, and assign that program
to the same numbered memory partition.
An example:
You want to run "Notator SL", "X-alyzer" (a Yamaha DX-7 synthesizer
editor from C-Lab) and "PolyFrame" (a universal synthesizer librarian
from C-Lab).
The Notator SL dongle is found in slot 1 (or the cartridge connector of
the Unitor-2), X-alyzer's dongle is in slot 2, and PolyFrame's dongle
is in slot 3.
In the SoftLink setup program (LINKEDIT.PRG) Notator is already set to
partition 1. Next set "X-alyzer" to partition 2, and "PolyFrame" to
partition 3.
When you switch between the various partitions (pressing <right-Shift> and the corresponding partition-number on the keypad), the dongle-slots will follow. You will see the red LED next to each slot light up, showing which one is active. No lit LEDs means that slot 1 is active.
If for some reason you need to manually switch between memory partitions (i.e. you've assigned programs to other numbers than their corresponding dongle-slots, or you're switching between dongles without using SoftLink) you can simply press the "C-Lab" logo which is found on the front of the unit -it's actually a switch as well as a company logo!
| Cartmaster | |
Click for image (will open new window) |
Like the Combiner, it also contains connections for 4 dongles, but lacks the LEDs indicating which dongle is in use.
Also note that since
the CartMaster has a
more "open" design than the Combiner, dongles can actually be
physically fitted either way (if you put them the wrong way you can
damage either the dongle(s) and/or the rest of the computer hardware!).
When the CartMaster is fitted to Atari ST, the dongles should face the
back of the computer (i.e. the front side/labelling of each dongle
shouldn't be seen unless you bend over the computer and backwards).
For slot 1 (the left hand side of the CartMaster), the dongle's front
side/labelling should face upwards.
NOTE: If you switch on the computer and nothing happens and/or you hear strange noises or things otherwise seem suspicious, switch off the computer immediately and check your connections!
Like the Combiner, the CartMaster also defaults to slot 1 (when
the computer is switched), so the Notator dongle should always be
placed there. Along with the CartMaster you get an ACCessory for
switching between the 4 slots.
Unlike Combiner, you have to do the switching manually -it's not as
complicated as it sounds. This is what you do when running Notator and
other programs under SoftLink:
- Provided you have the Notator dongle in slot 1 (as it should be) and you haven't changed the setting in the CartMaster ACCessory, slot 1 should be selected by default. If in doubt, go to the ACCessory and see if slot 1 is selected.
- Run the SoftLink setup program if needed, or the actual SoftLink program itself, which will start SoftLink followed by Notator.
- When Notator has completed loading, switch over to partition 2, where you will be loading the second program into memory.
- If the program you now want to run uses a dongle, go to the CartMaster ACCessory and select the slot of that dongle. Now run the program.
- To load the third program into slot 3, switch over to partition 3.
- Again, if this program needs a dongle, set the CartMaster ACCessory to access the slot of that dongle, then run the program.
- Repeat this procedure if running more programs (if you have
room for more).
As SoftLink provides you with a new "virtual Atari ST" for each memory partition, the chosen cartridge slot of the CartMaster ACCessory is memorized, and you can from now on switch between the SoftLink memory-partitions without having to worry about which dongle belongs to which program.
For more information about the CartMaster, go to Wizztronics':
http://www.wizztronics.com/cartmast.htm
| Log-3 | |
Click for image (will open new window) |
Notator Logic also comes with disks containing Notator SL (version 3.21), and the Log-3 unit which supports both programs in several ways.
(version 3.21 is the latest version of Notator SL and is needed in order to recognize and take advantage of the Log-3 hardware).
The Log-3 contains a built-in dongle which supports both Notator Logic and Notator SL.
WARNING: You should NOT use a Notator SL (or Creator SL) dongle together with the Log-3: it can damage both the computer and the Log-3!!!!
This is usually no problem if you bought
only Notator Logic, but if you
already had a full copy of Notator SL or Creator SL from before you'll
have an additional dongle on its own.
It might come in handy for using on another Atari ST computer though,
if you need to run Notator at two different places instead of
disconnecting the dongle all the time (i.e. at home and at the studio).
The Log-3 also contains 3 additional MIDI OUT ports (actually,
there are 4 OUT connectors present, but 2 of these are connected to the
same port).
In Notator SL this gives you MIDI output to ports "B", "C" and "D"
which is incidentally the same ports as the "Export" unit gives....
Let me explain; due to the architecture of the RS-232 port
(which is a serial port, meaning data for those 3 ports have to be
shared and thus can congest and be delayed as opposed to a parallel
port as the cartridge connector which the Log-3 is connected to),
Emagic probably found it beneficial to take advantage of this instead,
causing a more steady MIDI flow.
Songs that have been recorded using Notator/Creator SL, utilizing
Export's "B", "C" and "D" ports are automatically converted and
re-routed to ports "g", "h" and "i" (note lower-case lettering) of the
Log-3 respectively.
(The name of the MIDI output device will still say "Export" alongside
each track. However, when creating a new song, the name "LOG3" will be
shown instead.
The Log-3 can also be used together with the Unitor 2 (but not
the Unitor "C" or "N" units as these contain built-in dongles, and as
mentioned earlier you should not use Notator SL or Creator SL dongles
together with the Log-3.
A combination of the Log-3 and Unitor 2 will give you a total of 6 MIDI
OUT ports (96 channels), 3 MIDI IN ports (48 channels) and SMPTE sync
in/out!
(note: only version 3.21 of Notator SL supports the Log-3).
Depending on your needs and budget (and availability of these devices), there are several hardware solutions available for a Notator SL system. Here's a overview showing the different combinations; what you need and what you get in terms of MIDI IN/OUT ports. (In addition you can also add Human Touch or Steady Eye and/or Combiner for added sync possibilities and dongle/cartridge expansion):
|
|
||
| Hardware setup | MIDI IN ports | MIDI OUT ports (names) |
| Atari ST
=
|
1 1 MIDI IN port/16 channels |
1 (A) 1 MIDI OUT port/16 channels |
| Atari ST Export =
|
1 none 1 MIDI IN port/16 channels |
1 (A) 3 (B,C,D) 4 MIDI OUT ports/64 channels |
| Atari ST Unitor (C/N/2) =
|
1 2 3 MIDI IN ports/48 channels |
1 (A) 2 (E,F) 3 MIDI OUT ports/48 channels |
| Atari ST Unitor (C/N/2) Export =
|
1 2 none 3 MIDI IN ports/48 channels |
1 (A) 2 (E,F) 3 (B,C,D) 6 MIDI OUT ports/96 channels |
| Atari ST Log-3 =
|
1 none 1 MIDI IN port/16 channels |
1 (A) 3 (B,C,D) 4 MIDI OUT ports/64 channels |
| Atari ST Log-3 Export =
|
1 none none 1 MIDI IN port/16 channels |
1 (A) 3 (B,C,D) not used 4 MIDI OUT ports/64 channels |
| Atari ST Unitor-2 Log-3 =
|
1 2 none 3 MIDI IN ports/48 channels |
1 (A) 2 (E,F) 3 (B,C,D) 6 MIDI OUT ports/96 channels |
| Atari ST Unitor-2 Log-3 Export =
|
1 2 none none 3 MIDI IN ports/48 channels |
1 (A) 2 (E,F) 3 (B,C,D) not used 6 MIDI OUT ports/96 channels |
As you can see, there are several combinations which give the
same amount of MIDI ports/channels....
A fully MIDI expanded Notator SL-only system compromises of an Export
and a Unitor (C, N or 2). This gives 3 MIDI IN ports (48 channels) and
6 MIDI OUT ports (64 channels).
If you buy Notator Logic and thus get the Log-3 (which has to be used with Notator Logic as it also contains the dongle for that program), the Export becomes redundant under Notator SL (version 3.21) as the Log-3 re-routes those ports for higher efficiency than the Export could ever handle, as explained earlier.
The most effective MIDI-expansion solution for Notator SL, giving most MIDI ports/channels as well as highest performance (tightest timing etc.) would thus be as follows:
|
|
||
| Hardware setup | MIDI IN ports | MIDI OUT ports (port names) |
| Atari ST Unitor-2 Log-3 =
|
1 2 none 3 MIDI IN ports/48 channels |
1 (A) 2 (E,F) 3 (B,C,D) 6 MIDI OUT ports/96 channels |
...So, having an Export when using Notator SL together with a Log-3 is pointless, but...
with Notator Logic, the Export is recognized and will give you a total of 9 MIDI OUT ports (144 channels).
(Notator Logic is mentioned in this FAQ as you can only get the Log-3 with the complete Notator Logic package, and as long as you have the software you might want to use it as well -but for general Logic related questions, please refer to separate user-groups).
If you want to have a fully expanded system under both Notator SL and Notator Logic, the following combination will be the ultimate solution:
|
|
||
| Hardware setup | MIDI IN ports | MIDI OUT ports (port names) |
| Atari ST Unitor-2 Log-3 Export =
|
1 2 none none 3 MIDI IN ports/48 channels |
1 (A) 2 (E,F) 3 (g,h,i) 3 (B,C,D) 9 MIDI OUT ports/144 channels |
Hardware expansion
solutions:
summary
![]()
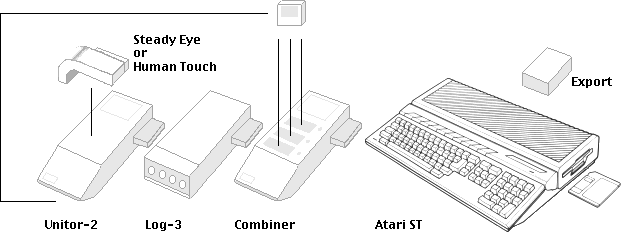
As explained above, a fully expanded system for Notator SL (and Notator Logic) can contain quite a few "black-boxes". Only one combination of all these add-ons for the cartridge port works properly however. Connect them in this order: Unitor-2 -> Log-3 -> Combiner -> Atari ST.
- Starting with the "Combiner" the system will be able to
accept additional dongles (in case you have other dongle based
software).
- Next the "Log-3" contains the copy protection
dongle-electronics for both Notator SL and Notator Logic and gives you
3 extra MIDI OUT ports (4 connectors, where 2 are for the same port).
- At the end of the (cartridge connector) chain is a
"Unitor-2". This gives SMPTE synchronization in and out, 2 MIDI OUT and
2 MIDI IN ports and accepts either the "Steady Eye" for VITC
professional video synchronization or "Human Touch" for
audio-synchronizing.
You also get an additional cartridge connector -do NOT place the Notator SL dongle here as it can damage the computer and isn't needed since it's included inside the "Log-3"!.
(Only a Unitor-2 can be used together with the Log-3 because of this). - At the back of the Atari ST; the modem connector to be exact, an "Export" can be inserted for 3 additional MIDI OUT ports.
![]()
48 MIDI IN/96 MIDI OUT channels
....this will give you a total of 3 MIDI IN and 6 MIDI OUT ports (48
IN/96 OUT channels) under Notator SL,
and under Notator Logic: 3 MIDI IN and 9 MIDI OUT ports (48 MIDI IN/144
OUT channels!)
Should be enough for most people!
| |
Click for image (will open new window) |
The dongle is a small copy-protection device roughly the size of a matchbox which fits into the cartridge port of an Atari ST.
According to a member of the Notator mailing list, it contains a custom programmed chip designed to respond to the dongle-checking routines of Notator with specific signals at a specific rate, which is one of the reasons hardware accelerators don't work with the program, and you need to disable the cache when using a Mega STe (with version 3.21 of Notator you don't need to bother with this though as the program sets this to 8MHz/cache off, then sets it back to the original setting when you exit Notator!).
The advantage with a dongle over normal disk-copy protection is
that you can make as many backup copies of your Notator disks as you
want and install it on your harddisk, but you won't be able to use the
program without the dongle connected to the machine.
But there are some downsides to all of this.
The first one being that the electrical contacts corrode or get dirty
over time as well as it becoming "wiggly" when repeatedly unplugged (if
the user has several computers where he/she wants to run Notator but
has only one copy of the program). It has also been reported that the
dongles can "go bad".
And if the user has several dongle based programs, a dongle expansion unit (such as C-Lab's own "Combiner") must be bought. The alternative is to plug/unplug each dongle according to which program is used at the moment. Dongle expansion units are usually quite expensive.
Because of all these problems, subscribers of the
Notator/Creator SL mailing list were hoping for a freeware release of
Notator from Emagic since it is no longer sold or supported by them.
A freeware release would naturally do away with the dongle, and since
other commercial software products have been released as freeware
(instead of just removing them from the market entirely and be
forgotten after a while), why not do this with Notator as well?
But Emagic replies that this is out of the question as it could
steal potential Notator Logic customers as they would probably just buy
a cheap Atari ST and use the freely available Notator SL instead of
buying a PC or Mac and use their currently available Notator Logic.
A disappointing outcome, but hey -we gave it a shot!
If you haven't contacted Emagic before, or want to contact them again,
urging them to reconsider you can email them at:
info@emagic.de (for
information)
support@emagic.de (for
support)
http://www.emagic.de (Website)
Many users have reported of problems when trying to start up
Notator.
"Bombs" showing up on the screen or simply that the whole system
"freezes" (locks up) before Notator has even been completely loaded
into the computer.
Freezes might also occur in the midst of a session which is very
annoying to say the least (make a habit of saving your work as you go
along, even with a 100% working system a power failure or something can
occur!).
Most of these problems can be traced back to the dongle as it is indeed
the most vulnerable part of the system.
The most likely reason for your problems is that the dongle is having contact problems with the cartridge port. Here are some simple steps that will hopefully do the trick:
- Switch off your Atari ST (very important!).
- Remove the dongle.
- Clean both the connector on the dongle and the cartridge
connector in the Atari ST computer.
You can use isopropyl alcohol rubbed on with a Q-tip for this. Some people have also reported much success by using a (clean!) pencil-eraser for the dongle's contacts.
The pencil-eraser should effectively remove any dirt and grime. Be sure that all those gold covered contact surfaces look clean and shiny.
If the dongle doesn't sit firmly in the cartridge port as it should and "wiggles" instead you should also have a look at the connection pins on the Atari ST as well. These may well be bent so as not to firmly touch the cartridge's connection surface.
Use a small screwdriver and carefully bend those pins towards the middle of the connector. That way they'll fit snugly around the dongle. - Insert the dongle in the cartridge port again.
Hopefully all those bombs and freezes will be history!
If the dongle still won't work you have to consider the following:
- The dongle is damaged
(this has been known to happen, though not very often).
In this case Emagic says that one should contact the local Emagic representative who should be able to help you with a replacement.
If you don't know who your local Emagic agent is, have a look at Emagic's list of distributors worldwide:
http://www.emagic.de/company/distributors/index.php?lang=EN
where you will find addresses and contact information to the one in your country.__________________________________ - Notator clashes with some of your other programs
(AUTO programs, ACCessories, CPX modules and so on).
Disable all of these by renaming the filename extensions or deleting them so you have a "clean" system meaning that the only program running on the machine will be Notator. Naturally, if you find all the problems having disappeared the dongle is indeed not at fault, but a program which is incompatible with Notator.
(read about this elsewhere in this document).__________________________________ - The disk is damaged.
If using a disk-only system where you repeatedly use the same Notator disk it is also worth considering that the disk might simply be worn out!
(Disk drives also get worn out eventually, but more frequent is the need for cleaning the drive/drive heads as dust not so infrequently shows up inside these units).Format a new, blank disk and copy Notator over to this from one of the backup disks that came with the Notator package (you haven't been using the original disks, have you?).
Harddisk users might also experience problems due to a corrupted program -remember to maintain your harddisk by defragmenting it and checking data consistency by using one of the many suitable programs for this ("Diamond Edge" comes to mind here).
If in doubt, replace the existing Notator (or Creator) program with the one on your backup disks, or download a fresh copy of the latest version from:
- http://www.notator.org/html/software.html#notator321 (Notator SL 3.21)
- http://www.notator.org/html/software.html#creator316 (Creator SL 3.16)
__________________________________ - The cartridge connector (in the Atari ST) is damaged.
This could mean either a bad connection to the part where the dongle fits, or a bad connection inside the machine, where it's soldered to the Atari ST circuit board.
If you feel competent enough to open up your machine you may want to look things over, possibly resoldering the joints inside the machine (the cause might have been some "cold solder joints") or if all fails you may need to desolder the whole cartridge connector and get a new one from your Atari dealer.__________________________________ - The computer itself is at fault.
There could be a million reasons for this which a FAQ document on its own would be sufficient for.... but a simple way to check this is to try other programs on your machine and see if the problems continue. If not, then it must have something to do with cartridge port or Notator.
Given the price of used Atari ST computers you might often be better off replacing the machine than sending it in for service (the Atari STe being the computer of choice as it's easy/cheap to expand the memory is the most up-to-date regular model of the ST family).
Yes, Notator SL is a huge program
(well, actually it's more
deserving to call it a complete musical system), and the 'phone book'
thick manual really is a bit to go through.
Many computer users (such as myself) get pretty tired of yet another
user manual, so what we do is try to grasp what we can by trying out
the program's various features using the mouse, then looking up the
manual for what we don't understand.
However, Notator is such a specialized and complex program that you
should at least read through the basics of the user manual, then take
it from there.
Notator is a power-packed program with features you might never use, so the good thing is that you don't have to learn everything explained in the manual! Then there's the mailing list of course, where you can meet other Notator users -some more experienced than others. Who knows, maybe you can learn a thing or two!
Lots of simplified user-manuals for Notator have been written in several languages. There's even a video tutorial. It's called "Emagic & Notator video training manual" by Tim Walter (Labyrinth video manuals, 1993).
| |
Click for image (will open in new window) |